How to Remove Primer from Tile Floors: Easy Methods and P...
Renovating or remodeling your home often involves the use of primer. While necessary for sealing...

Why Tiles Fall Off: Common Causes of Tile Detachment Ceramic tiles are a favorite for bathrooms, kitchens, and pools in American homes because they’re durable, water-resistant, and low maintenance. But even the most well-installed tiles can fall off or loosen over time. If you’re facing a detached tile and can’t reach a contractor, don’t worry — you can fix it yourself.
Before grabbing your tools, it’s essential to understand why tiles detach in the first place:
Poor installation: Rushed jobs or skipping critical steps during tile laying, like proper surface prep or adhesive mixing, can cause tiles to eventually fall off.
Air gaps beneath tiles: Voids in the adhesive layer weaken the bond. If more than 10-15% of the surface lacks coverage, tiles will likely loosen.
Improper surface prep: Dusty, painted, or unprimed surfaces don’t allow adhesives to stick well. Clean, dry, and primed surfaces are a must.
Uneven substrates: Installing tile over rough or unlevel areas can create movement and stress on the tile.
Wrong adhesive: Not all tile glues are created equal. Using the wrong product for your surface can reduce bonding strength.
Incorrect glue mixing: Adhesives must be mixed precisely according to manufacturer instructions. Too much or too little water weakens the bond.
Expired adhesive: Old, lumpy, or dried-up products should be discarded.
Incorrect thickness of adhesive: Too thin or too thick a layer prevents proper bonding.
Temperature and humidity: Cold rooms (under 50–60°F), temperature swings, or high humidity can prevent proper curing.
Impact or vibration: Heavy blows, footsteps, or structural vibration can dislodge tiles.
House settling: New homes or wood-frame houses can shift and cause tiles to detach.
Best Adhesives to Reattach Loose Tiles
Once you understand the reason for the failure, you can move on to repairs. If the tile is still intact and free of cracks or chips, you can reinstall it. If it’s damaged, you’ll need a replacement.
These come in various forms, depending on your surface:
Cement-based adhesives: Best for brick or concrete surfaces; ideal for most wall and floor applications.
Dispersion (ready-to-use) adhesives: Great for indoor wall or floor tiles.
Polyurethane-based adhesives: Suitable for a wide variety of surfaces.
Epoxy adhesives: Highly resistant to moisture; ideal for wood, metal, or damp environments like basements or showers.
If you're using powdered adhesives, be sure to measure water precisely and follow the package directions closely.
This is a ready-made adhesive, sold in plastic tubs. It’s perfect for smaller jobs and easy to use. Just stir and apply.
You can also mix your own adhesive using cement, sand, and water — adding a little white PVA glue (like Elmer’s) for better adhesion. It's eco-friendly and great for large areas, but you'll need to get the mix right.
Suggested ratios:
Cement M300: 1 part cement to 4 parts sand
Cement M400: 1:5
Cement M500: 1:6
Add about 7 ounces (200g) of PVA glue per 2.5 gallons (10L) of mix.
For minor repairs on smooth surfaces, some DIYers use thick paint-like adhesives, silicone caulk, or even construction adhesives (like Liquid Nails). Bitumen and resins can also work but are usually best for horizontal surfaces due to their weight and flow under heat.
Step-by-Step: How to Reattach a Tile
Before starting, examine all nearby tiles. Tap them gently — a hollow sound indicates poor bonding. If more than 25% of the area sounds hollow or loose, consider redoing the whole section. If it's just one or two, follow these steps:
Remove Nearby Loose Tiles
Gently pry them off if they're unstable.
Clean Off Adhesive
Scrape old glue from the back of tiles and the wall/floor using a knife, angle grinder, or coarse sandpaper.
Prepare the Surface
Clean and level the area. A smooth, dust-free surface helps ensure good bonding.
Soak the Tile in Water
Let it sit for about 30 minutes — this softens old adhesive and helps the new glue bond better.
Prime the Surface
Use a tile primer or watered-down PVA glue. Let dry between coats (wait about 40–60 minutes).
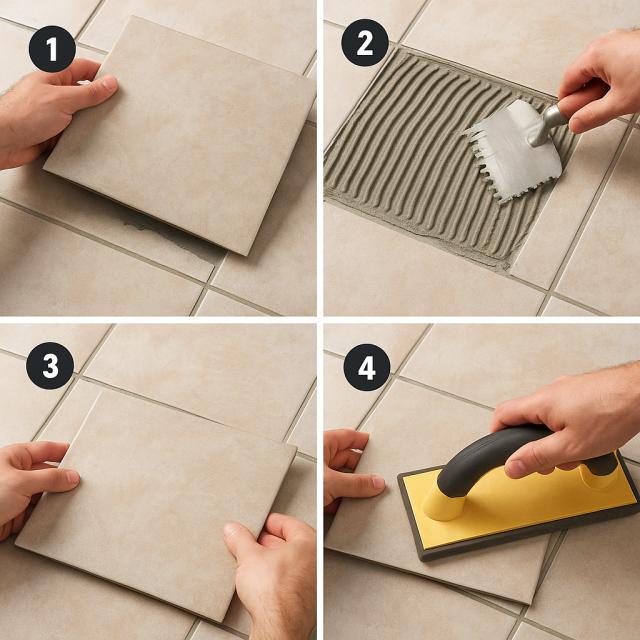
Apply Fresh Adhesive
Use a notched trowel to spread tile adhesive. If a thick layer is needed (over ½ inch), first build up the area with adhesive and let it dry, then apply a second thin coat.
Press Tile Into Place
Press the tile in gently and tap lightly with your hand or a rubber mallet.
Check Level
Use a spirit level and tile spacers to ensure consistent alignment.
Clean and Grout
After two hours, use a utility knife to remove excess adhesive. Wait 24 hours, then apply grout.
If the tile is clean but the glue remains on the wall:
Check adjacent tiles for stability.
Remove the loose ones and scrape off glue using a chisel and hammer or grinder.
If scraping is hard, apply two coats of primer to seal the old glue.
Apply new adhesive to the back of the tile (not the wall). You can use mastic or construction adhesive (like Liquid Nails).
Press the tile into place and hold firmly.
Replacing a Broken Tile with a Mirror
If your tile fell off in a visible area, like eye level, why not use it as an opportunity to refresh your décor?
Installing a decorative mirror can look stylish and functional. Here’s how:
Prepare the Area
Level the wall with tile adhesive, leaving a ⅛" gap for the mirror.
Sand and Prime
Smooth out with sandpaper. Wipe clean and apply a primer (2 parts water to 5 parts liquid glass or similar product).
Apply Mirror Adhesive
Create a grid on the back of the mirror using silicone-based glue.
Attach the Mirror
Press it into place and secure it with painter’s tape until the adhesive cures.
Decorate the Edges (Optional)
Add mosaic tiles, trim, or molding for a designer finish.
What If the Tile Is Cracked?
Minor cracks can be filled with grout or tile filler. But large cracks mean the tile must be replaced. Here’s what to do:
Remove the Grout
Use a grout saw or utility knife to remove grout around the tile.
Drill Relief Holes
Drill a few holes in the tile to help break it cleanly.
Break and Remove the Tile
Use a hammer and chisel to carefully break and remove the pieces.
Remove Old Adhesive
Scrape the wall clean. Prime it like before.
Install New Tile
Apply fresh adhesive to the new tile and press it into place.
Tips to Prevent Tile From Falling Again
To ensure your repair lasts:
Follow adhesive instructions: Stick to the manufacturer’s guide.
Prime the surface: Always apply primer before tiling.
Use correct water ratios: Don’t eyeball it — use measuring tools.
Moisten dry tiles before gluing: This prevents them from absorbing moisture from the adhesive.
Use spacers for even grout lines.
Choose grout with waterproofing agents: Silicone, latex, or epoxy-based options offer the best results.
Final Thoughts
Fixing a loose or fallen tile is a manageable DIY task — no need to panic or call in the pros. With the right tools, adhesives, and steps, you can restore your wall or floor and make it look brand new. Whether you’re reattaching a single tile or replacing a broken one with a mirror upgrade, your bathroom or kitchen can stay stylish and strong.

How to Remove Primer from Tile Floors: Easy Methods and P...
Renovating or remodeling your home often involves the use of primer. While necessary for sealing...

Bathrooms are notorious for high humidity, which can lead to mold growth. Mold not only ruins the...

Thanks for joining our homeowners’ community.
Stay tuned!
Choose the category
Choose the category