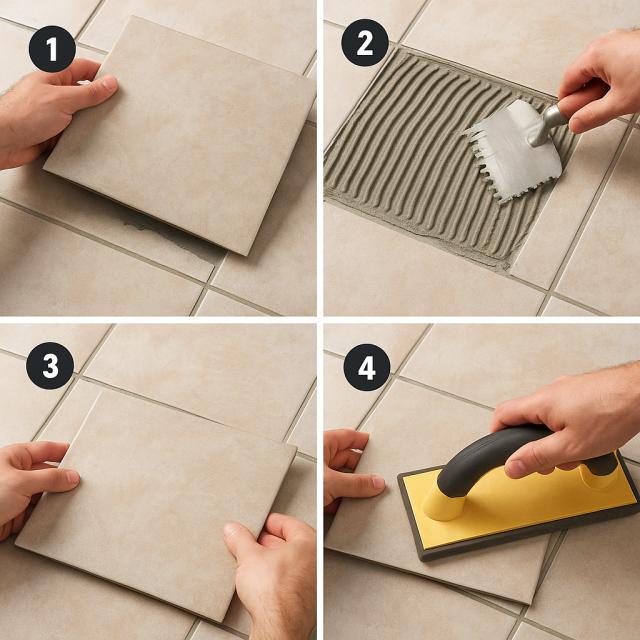
How to Reattach a Loose Tile: Step-by-Step Guide
Why Tiles Fall Off: Common Causes of Tile Detachment Ceramic tiles are a favorite for bathrooms,...

Bathrooms are notorious for high humidity, which can lead to mold growth. Mold not only ruins the look of your bathroom but can also harm your health. The best way to combat this issue is by installing proper ventilation. This guide will walk you tables to create a fresh, mold-free bathroom. Whether you’re a homeowner or a DIY enthusiast, you’ll find clear steps to set up an effective ventilation system tailored for the U.S. market.
Why Ventilation Matters in Your Bathroom
Bathrooms generate a lot of moisture from showers, baths, and even sinks. Without proper airflow, this moisture lingers, creating a breeding ground for mold and mildew. These can damage walls, ceilings, and fixtures while posing health risks like allergies or respiratory issues. A good ventilation system removes humid air and brings in fresh air, keeping your bathroom dry and healthy.
In most U.S. homes, ventilation ducts are built into the structure during construction. However, you might need to extend or improve these systems, especially if you’re renovating or adding features like a drop ceiling. This guide covers both natural and forced ventilation options, focusing on practical solutions for American homeowners.
Before starting, gather these tools and materials to make the installation process smooth:
Screwdriver (Phillips or flathead, depending on your ventilator)
Drill with masonry bits (for expanding duct openings)
Hammer and chisel (for manual duct adjustments)
Measuring tape
Marker or pencil
Plastic ventilation ducts (smooth-walled, typically 4-6 inches in diameter)
Exhaust fan (suitable for bathroom use, with appropriate IP rating)
Duct tape or sealant
Vibration-dampening pads (optional, for noise reduction)
Safety gear (gloves, safety glasses, dust mask)
These are commonly available at U.S. home improvement stores like Home Depot, Lowe’s, or online retailers like Amazon. Check your local building codes, as some areas in the U.S. may require specific permits or standards for ventilation systems.
Most homes in the U.S. have ventilation ducts installed during construction, but renovations like adding a drop ceiling may require extending these ducts. Use smooth-walled plastic pipes, typically 4 to 6 inches in diameter, to ensure good airflow. Avoid sharp bends (less than a 4-inch radius) to prevent airflow restrictions. You can find these pipes at hardware stores, and they’re easy to cut and connect with duct tape or clamps.
To extend a duct:
Measure the distance from the existing duct to your desired endpoint.
Cut the plastic pipe to size using a hacksaw or pipe cutter.
Connect the new pipe to the existing duct, ensuring a tight seal with duct tape or a clamp.
Secure the pipe to the ceiling or wall using brackets, following local building codes.
This setup ensures humid air flows out efficiently, reducing the risk of mold.
If your bathroom’s natural ventilation (like a window or existing duct) isn’t enough to keep humidity low, you’ll need a forced ventilation system. This typically involves installing an exhaust fan that pulls moist air out and directs it through the ventilation duct. Fresh air then enters the bathroom to replace the removed air, maintaining balance.
For forced ventilation to work effectively:
Leave a small gap (about ¾ inch) under the bathroom door to allow fresh air to flow in. This is a common practice in U.S. homes to ensure proper air circulation.
Position the exhaust fan opposite the door to maximize airflow across the room. This setup pulls in more fresh air and expels humid air efficiently.
Exhaust fans are widely available at stores like Ace Hardware or online, with prices ranging from $20 to $150 depending on features and power.
Selecting the right exhaust fan is key to effective ventilation. Here’s what to consider when shopping in the U.S.:
Size and Duct Compatibility: Most bathroom fans are designed for round ducts, typically 4 or 6 inches in diameter. Measure your duct’s diameter before buying to ensure a proper fit.
Power and Airflow: Fans are rated by cubic feet per minute (CFM), which measures how much air they move. To calculate the right CFM for your bathroom, multiply the room’s volume (length × width × height in feet) by 5. This ensures the fan replaces the air at least five times per hour. For example, a 10 × 8 × 8-foot bathroom (640 cubic feet) needs a fan with at least 75-100 CFM.
Noise Level: Look for fans with a noise rating below 40 decibels (dB), about the level of a quiet whisper. This ensures the fan won’t disturb you, especially in smaller homes or apartments.
Moisture Protection: Choose a fan rated for bathroom use, with at least an IP34 rating to handle humidity safely. This is standard for most bathroom fans sold in the U.S.
Additional Features: Some fans come with a check valve to prevent backflow of air from the duct, which is useful in multi-story buildings. Fans with ball bearings last longer and run more smoothly than those with sleeve bearings.
Check the fan’s packaging or description, as most U.S. manufacturers (like Broan, Delta, or Panasonic) list the room size or type the fan is designed for, making selection easier.
Modern exhaust fans come with features that add convenience and efficiency:
Noise Control: Fans under 40 dB are ideal for quiet operation, especially if your bathroom is near living spaces.
Check Valve: This prevents outside air or odors from flowing back into the bathroom, which is common in apartment buildings or homes with shared ducts.
Bearings vs. Sleeves: Fans with ball bearings are more durable and reliable than those with sleeve bearings, especially for frequent use.
Smart Controls: Some fans activate automatically via humidity or motion sensors, turning on when needed and shutting off to save energy. Others can be wired to turn on with the bathroom light or controlled by a timer. These are great for energy-conscious homeowners and align with U.S. trends toward smart home technology.
Brands like Broan-NuTone and Delta Breez offer models with these features at reasonable prices, available at major retailers or online.
Once you’ve chosen your fan and decided how it will activate (manual switch, light switch, or sensor), it’s time to install it. Follow these steps for a smooth installation:
Prepare the Duct: Check the ventilation duct where the fan will be installed. If the opening is too small, widen it using a hammer and chisel or a drill with a masonry bit. Wear safety gear to protect against dust and debris.
Mount the Fan: Insert the fan into the duct, following the manufacturer’s instructions. Most fans slide into the duct and are secured with screws or clips. Use a screwdriver or drill to fasten it in place.
Reduce Noise and Vibration: To minimize noise, place vibration-dampening pads (available at hardware stores) between the fan and the duct or ceiling. This is especially helpful in older homes with thin walls.
Attach the Grille: Snap or screw the fan’s grille onto the ceiling or wall, covering the duct opening. This grille is both functional and decorative, blending with your bathroom’s design.
Connect the Wiring: If you’re not comfortable with electrical work, hire a licensed electrician to connect the fan to your home’s wiring. This ensures compliance with U.S. electrical codes (like the National Electrical Code) and prevents safety hazards. If you’re experienced, follow the fan’s wiring diagram to connect it to a switch, light, or sensor.
Test the Fan: Turn on the fan to ensure it runs smoothly, moves air effectively, and doesn’t produce excessive noise or vibration.
Always check local building codes before starting, as some U.S. municipalities require permits for ventilation or electrical work. You can find code information at your local government office or online through sites like UpCodes.
To keep your bathroom ventilation system working well:
Clean the fan grille and blades every 6 months to remove dust and debris, which can reduce airflow.
Check the duct annually for blockages or leaks, especially in older homes.
Replace the fan if it becomes noisy or less effective, typically after 5-10 years, depending on the model.
Regular maintenance prevents mold and ensures your bathroom stays fresh and healthy.
Installing proper ventilation in your bathroom is a smart investment for any U.S. homeowner. It protects your home from mold damage, improves air quality, and enhances comfort. With affordable fans and materials available at stores like Home Depot or Lowe’s, and a bit of DIY know-how, you can create a healthier bathroom environment in just a few hours. Follow this guide, and you’ll enjoy a fresher, safer space for years to come.

How to Reattach a Loose Tile: Step-by-Step Guide
Why Tiles Fall Off: Common Causes of Tile Detachment Ceramic tiles are a favorite for bathrooms,...

Bathrooms aren’t just practical spaces for daily routines—they’re where we unwind after a long da...

Thanks for joining our homeowners’ community.
Stay tuned!
Choose the category
Choose the category