DIY Plumbing Layout for Your Bathroom and Toilet in the a...
When renovating a bathroom, one of the most important (and often underestimated) steps is laying...

Renovating a bathroom is a major investment, often costing as much as half of what you’d spend upgrading an entire home. Unlike repainting walls or swapping out furniture, bathroom updates are built to last, so you want to get it right the first time. The key to a long-lasting bathroom? Proper waterproofing.
Water can wreak havoc, causing mold, damaging finishes, and even leading to costly repairs for you or your neighbors downstairs. This guide will walk you through why waterproofing is essential, the best materials to use, and how to do it yourself without flooding the folks below.
Water might seem harmless, but it’s a silent destroyer. Even small amounts, like condensation, can lead to mold, mildew, and a musty smell that ruins your bathroom’s vibe. A burst pipe, forgotten faucet, or leaky shower can escalate things, potentially flooding your home and your neighbor’s. Waterproofing protects your bathroom’s walls, floors, and ceilings, keeping moisture from seeping into porous materials like concrete or drywall. It prevents structural damage, keeps mold at bay, and saves you from expensive repairs.
In the U.S., building codes emphasize waterproofing in high-moisture areas like bathrooms. These standards ensure safety and durability, protecting your home from water-related disasters. Following them is crucial, especially in apartments or multi-story homes where leaks can affect others.
The U.S. market offers a variety of waterproofing solutions, each with its own strengths. Here are the three main types you’ll encounter:
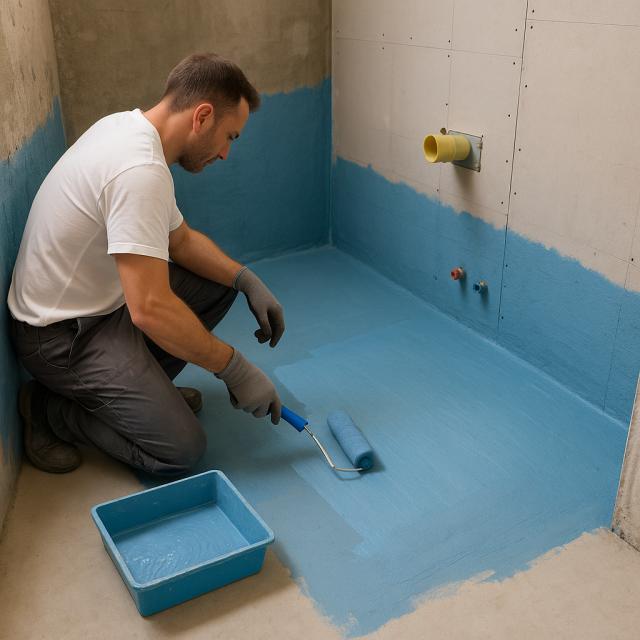
Liquid-Applied Waterproofing: These are coatings, like mastics or membranes, that you brush or roll on. They create a seamless, flexible barrier perfect for floors, walls, and ceilings.
Roll-On Membranes: Self-adhesive sheets you lay down, mostly for floors. They’re quick to install but less flexible for tricky spots like corners.
Penetrating Sealers: These soak into surfaces like concrete, sealing pores to block water. They’re great for specific applications but less common for full bathroom coverage.
Each type varies in cost, ease of use, and suitability for different surfaces. Let’s dive into the most popular options.
Liquid-applied products are versatile and widely used because they’re easy to apply and form a seamless barrier. Here’s a breakdown of the top choices:
Polyurethane Mastic: This is a flexible, durable coating made from polyurethane resins. It’s great for both floors and walls, sticking well to concrete, drywall, and more. It’s even safe enough for surfaces near drinking water. However, it’s pricey and requires a lot of material. Expect it to take about a week to fully cure, with a minimum application temperature of 14°F to 86°F.
Polymer-Based Mastic: Ready-to-use and ideal for walls before tiling, this mastic is flexible and mold-resistant. It works well with underfloor heating but needs multiple layers and takes 10-15 hours to dry per coat, making it a slower option. It’s also on the expensive side.
Cement-Based Waterproofing: Perfect for stable surfaces like concrete or brick, this budget-friendly option is applied in two layers with a brush or trowel. It’s not flexible, so it’s not ideal for surfaces that shift or expand. It takes up to 72 hours to dry and isn’t suitable for drywall.
Bitumen Mastic: Made from petroleum-based bitumen, this is an affordable, elastic option that sticks to almost anything—concrete, wood, you name it. It doesn’t require heating, but it has a strong smell and is flammable, so ventilation is key.
Liquid Rubber: A modern twist on bitumen, liquid rubber is super elastic (up to 820% stretch) and durable. It’s easy to apply but costly and can be toxic, so use it in well-ventilated areas. It forms a waterproof membrane in about 24 hours.
Roll-on membranes are self-adhesive sheets, typically made from bitumen and a waterproof top layer. They’re budget-friendly and quick to install since they don’t need drying time. A standard roll is about 32 feet long, 2.5 feet wide, and weighs around 21 pounds. They last up to 45 years but aren’t very flexible, making them tricky for corners or pipe entries. They’re also flammable, so handle with care.
Here are some trusted brands available in the U.S., known for quality and reliability:
Ceresit: Offers a range of products, like the CL 51 Nano-membrane (a flexible mastic) and CR 65 Waterproof (a cement-based mix). Their products are great for seamless coatings and work at temperatures as low as 27°F.
Knauf: Their Flächendicht mastic is a solvent-free, blue emulsion perfect for tiling over. It sticks to concrete, brick, and drywall, making it a versatile choice for DIYers.
TechnoNICOL: Specializes in self-adhesive roll-on membranes for floors. These are easy to install on concrete or wood and work well under tile adhesive or screed.
Sika: Known for versatile products like Top Seal-107 (a two-part cement-polymer mix) and Sikalastic-022W (a single-component membrane for floors). Their solutions are great for both indoor and outdoor use.
Experts often recommend polyurethane mastics, like PolyFlex from Hydro, for their versatility and ease of use in small-scale projects.
Waterproofing your bathroom is a step-by-step process that varies based on the material and surface. If you’re tiling your bathroom, here’s a DIY guide to ensure it’s leak-proof and neighbor-friendly.
Focus on “wet zones” that need the highest protection:
The entire bathroom floor.
20 inches on either side of the bathtub or shower.
Walls above the bathtub or shower, up to the ceiling.
20 inches around and above the sink, plus the wall below it.
A 4-inch “pan” around the base of all walls.
Less critical “damp zones” (like other wall areas) still need some waterproofing, but you can use lighter materials.
Start with the floor, as it’s the most vulnerable to leaks. If you’re in a new home, check that the floor is level. In an older home, remove old screed, tiles, and plaster up to 6 inches on the walls to create a clean “pan.”
Steps:
Prep the Surface: Clean the floor and walls up to 6 inches, removing dust, grease, and debris. For old homes, strip down to the concrete slab.
Seal Joints: Create a 0.4-inch groove where the floor meets the walls and fill it with a bentonite cord or cement mortar.
Apply Primer: Coat the floor and 4-inch wall pan with two layers of primer, letting each dry fully.
Seal Pipe Entries: Use waterproofing sleeves or liquid rubber around pipes.
Apply Liquid Waterproofing: Brush on bitumen or polymer mastic over the floor and pan. For corners, embed reinforcing mesh or corner tape in the wet mastic.
Install Roll-On Membrane (Optional): Cut strips to the bathroom’s width plus 8 inches (4 inches per wall). Peel off the backing, stick the membrane to the floor, and press it with a roller, overlapping strips by 4 inches. Heat corners slightly with a hairdryer for a snug fit.
Finish: Once dry, pour a new screed and lay tiles.
Wall waterproofing depends on your finish, but cement-polymer mixes are versatile for tiling.
Steps:
Clean and Prep: Remove old finishes and repair plaster if needed.
Prime: Apply two layers of primer, focusing on corners and pipe entries.
Seal Joints: Use waterproofing tape for corners and sleeves for pipes.
Apply Waterproofing: Brush on the cement-polymer mix as per the product’s instructions, keeping layers thin (check the label for thickness).
Reinforce: Embed mesh in corners while the mix is wet.
Add Bonding Agent: Apply a concrete bonding primer right after waterproofing to prep for tiling.
Tile Promptly: Start tiling as soon as the waterproofing dries to avoid damage.
Ceilings don’t get direct water exposure but suffer from condensation, which breeds mold. Here’s how to protect them:
Steps:
Clean the Surface: Remove old paint or plaster, especially at wall joints.
Seal Gaps: Clean out seams between ceiling slabs to 1 inch deep and fill with silicone sealant. Apply cement mortar over dried sealant.
Treat Mold: If mold is present, scrub it off and apply a fungicide to the entire ceiling.
Apply Waterproofing: Use a liquid membrane or mastic as directed.
Ventilation Note: If installing a PVC stretch ceiling, ensure good bathroom ventilation, as these don’t breathe.
For floors, waterproofing goes under the screed to protect the slab. Use self-adhesive roll-on membranes, hydrophobic mastics, or penetrating sealers. Combining two methods (like mastic and roll-on) boosts protection.
Tiles are common in bathrooms, and waterproofing underneath is straightforward:
Steps:
Prep the Floor: Clean the concrete slab thoroughly.
Prime: Apply a latex or polymer primer to seal pores.
Apply Waterproofing: Use a liquid mastic or emulsion, following the product’s instructions.
Add Sand: Sprinkle a thin layer of quartz sand on wet waterproofing to improve tile adhesion.
Tile: Lay tiles once the waterproofing is fully dry.
Wooden homes, like log cabins, pose unique challenges due to wood’s expansion and contraction. Use highly elastic materials to accommodate movement.
Steps:
Seal Corners: Apply rubberized tape to corners to handle shifting.
Lay Membrane: Install a self-adhesive waterproofing membrane on the floor.
Screed: Pour a cement-sand screed with extra plasticizer for flexibility.
Tile: Use waterproof tile adhesive and epoxy or silicone grout.
Costs depend on your bathroom’s size, surface condition, materials, and whether you hire a pro or DIY. Here’s a rough guide for materials and labor in the U.S. (prices approximate, based on 2025 market trends):
Materials:
Knauf Flächendicht (1.3 gal): $20–$25
Ceresit CL 51 Mastic (4 gal): $60–$80
TechnoNICOL Roll-On (80 sq ft): $30–$40
Sika Top Seal-107 (20 lbs): $15–$20
Waterproofing Tape (33 ft): $15–$20
Labor (per square foot):
Liquid waterproofing: $5–$10
Roll-on membrane: $3–$7
Pipe sealing (per pipe): $30–$50
Surface prep: $2–$5
For a 50-square-foot bathroom, expect to spend $100–$300 on materials and $200–$500 on labor if hiring a professional.
Shop at reputable retailers to avoid fake or expired products. Home Depot, Lowe’s, and Amazon carry trusted brands like Ceresit, Knauf, and Sika. Check product reviews and ensure items are stored properly (not frozen or overheated). Specialty stores like Tile Giant or local hardware shops may also stock high-quality options.

DIY Plumbing Layout for Your Bathroom and Toilet in the a...
When renovating a bathroom, one of the most important (and often underestimated) steps is laying...

Bathroom electrical wiring isn’t just about plugging in your hair dryer. It’s about safety, moist...

Thanks for joining our homeowners’ community.
Stay tuned!
Choose the category
Choose the category